Mutley's Hangar
A Haven For Flight Simulation Enthusiasts!
For FSX/P3D/P3DV2 Developed by Opencockpits
Reviewed by Jack Whaley-Baldwin
October 2014
Introduction
For some, a chronometer is an interesting instrument; for others, it
is merely a fancy name for a watch. Despite its simplicity, there
exists the inescapable fact that the chronometer is one of the last
devices that simulator pilots take the time to use effectively. This
is, perhaps, somewhat understandable; a first time pilot is hardly
likely to want to spend his time fixated upon something that
measures only time.
In reality however, the chronometer is a fundamentally vital
instrument carried in one form or another in the cockpit of every
aircraft flying today. From being used to maintain a basic timed
track, to flying tightly accurate instrument procedures, the
chronometer is an essential piece of kit. Indeed, regardless of the
immense technical complexity of the most modern fly-by-wire
aircraft, there will always be at least one chronometer available at
all stages of flight for use by the crew.
In contrast to the proportionally lower demand for chronometers
within the flight simulation world, almost all of the well known
home-cockpit suppliers offer some sort of chronometer for hardware
use.
The experts at Opencockpits have recently announced the release of
two USB-driven Boeing 737 chronometers; with one being a slight
upgrade of the other (differences explained in the next section). I
find myself in the fortunate situation of being able to review the
more upgraded of the two chronometers from Opencockpits, which aims
to be a complete, fully-functioning replica of a real 737
chronometer.
Overview and Pricing
As briefly touched upon above, Opencockpits offer two variants of
their Boeing 737 chronometer.
The first version, the Boeing 737 “Lite” chronometer, features all
the buttons and displays of the real 737 chronometer, with the
exclusion of the seconds hand needle. This version is suitable for
most simmers and cockpit builders who simply want a functioning
chronometer, as opposed to an identical replica. For a UK buyer, the
“Lite” chronometer will cost around €189, inclusive of both VAT
and shipping, which works out to be around £156. Considering that a
power supply and USB cable are included in the purchase, and that
the instrument is completely plug and play, I think that this is a
very reasonable price; I know some cockpit builders will be used to
paying more than double that for a similar instrument.
The second, and superior variant of the 737 chronometer, features
the addition of a working, stepper motor driven seconds hand needle,
as well as all the features offered with the “Lite” edition.
Essentially, this second variant is an exact, complete replica of a
real 737 chronometer, and is marketed towards those simmers striving
for the highest degree of realism; catering for the most minute
levels of detail that the cockpit building community has become
renowned for. Whilst some may argue that a seconds hand needle isn't
worth fighting over, those of you with home cockpits of your own
will know that the more instrumentation you have moving, the more
there is to show off.
Naturally however, this upgraded chronometer is more expensive (but
not drastically so!). Inclusive of VAT and shipping, a UK buyer will
be looking to pay around €261, around £215. This is £59 more
expensive than the “Lite” edition, however the benefits are
self-evident.
The feature list below details the full range of features for both
chronometers. Features that are only available to the upgraded
edition are shown in red. Several options can be changed as per
customer requests (eg 7 segment display colour).
- all buttons fully operational as per the real unit;
- full warm/cool white (as per request) backlighting;
- all 7 segment display units (white or orange, as per
request) fully functional, complete with decimal points;
- high quality engraved faceplate;
- plug and play USB 2.0 connection (USB cable included);
- 6V power supply included;
- fully functioning stepper motor
driven seconds hand needle;
- available in 737 gray or 747/757/767 brown;
- FS2004, FSX and X-Plane compatible; and
- full software management through SIOC interfacing software
(available free from Opencockpits).
Don't be scared by the last bullet point; Opencockpits have provided
a working SIOC script for the chronometer, which means that the user
does not have to have any SIOC experience to get the chronometer
working in full.
On another note, the fact that the chronometer is interfaced using
SIOC actually means that one can pull off a whole wealth of things
that you wouldn't normally expect a chronometer to do. If you so
desire, you could have the aircraft's altitude displayed in one of
the 7 segment displays, or perhaps use the clock-face as an airspeed
indicator! However, for the sake of sanity, this review will use the
chronometer as a timepiece only.
With the basics covered, it's time to look at the chronometer
itself.
Initial Impressions
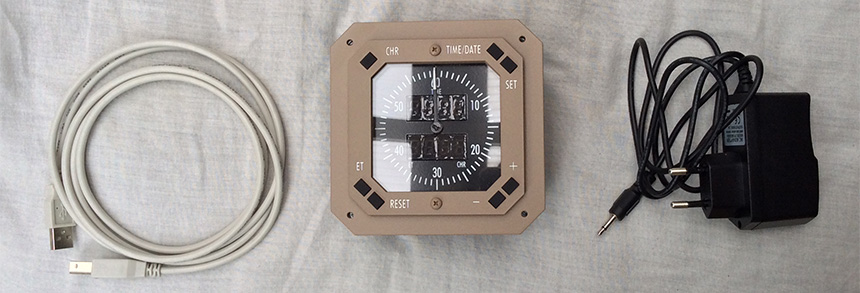
My chronometer arrived in true Opencockpits style; in a box filled
with masses of over-the-top packaging – not that I'm complaining of
course!
After eagerly (yet carefully) taking the chronometer out of the box,
I proceeded to give it a thorough visual inspection.
The first point of attention is that the chronometer looks, and
feels, like a very solid, compact unit. The entire array of Printed
Circuit Boards (PCBs), PIC microcontrollers, backlighting and the
stepper motor itself are all contained within a space behind the
faceplate no deeper than 70mm. The whole unit itself measures
110x110 mm in terms of height and width, and 80mm in depth.
It must be noted that the chronometer's circuitry is not enclosed within any sort of case. This means that, although the circuitry is shielded by the faceplate, the unit must be protected from dust and liquid spillages (although such precautions should be common sense). The reason for this is because cockpit builders love the flexibility of being able to fit their purchased instruments/modules into their own panels; as a result, excess casing and fittings are generally frowned upon.
The lack of casing does, however, reveal an advantage. It allows one to view the internal wiring, and, yet again, everything is looking top-notch in this respect. The majority of the wiring is very efficiently arranged with the use of ribbon cables, and, where ribbon cables have not been employed, free wires have been secured well. Opencockpits' name is clearly visible on the black PCBs, which indicate that these PCBs have been specifically engineered for use with the chronometer; indeed, the PCBs have “IOCARD_CHRONO” printed on them.
Although it's not normal that I pay this much attention to the physical arrangement of electronic components, I think that in this case, it is clearly visible that the developer has taken pride in the appearance of their work; the whole unit has a clean, sharp feel to it.
Connecting and Testing the Chronometer
Getting the chronometer working is a rather simple affair.
Firstly, the provided 6V power supply should be plugged into the circular socket at the back of the chronometer. I must point out that for UK users, a mains power adapter is necessary, as the 6V power supply Opencockpits have provided features the two-pin European style plug. This is, of course, not too much of a hassle, and users can always use their own 6V supply should they prefer.
Upon connection of the power supply, the white backlighting of the unit should illuminate, and the seconds needle should undergo a full rotation as the stepper motor calibrates itself, before stopping at the 60-seconds mark exactly (the “zero” position). More information about the stepper motor itself can be found later in this review.
Note: If, for whatever reason, the seconds needle had not been aligned with the 60-seconds mark prior to the connection of the power supply, it should be now. If the needle is not aligned with the 60-seconds mark, this means that the needle is not properly aligned with the axle of the stepper motor, and will require a small mechanical adjustment. Should you not feel comfortable with adjusting the chronometer's needle yourself, I have no doubt that Opencockpits would be willing to do so free of charge; they have been most helpful in the past regarding such matters. In my case however, the needle was, and remains, perfectly aligned with the zero position.
After the power supply has been connected, the USB cable should be inserted into the chronometer and the other end of the cable plugged into a free USB slot. The infamous Windows “ding-dong” should chime, and the device should be successfully recognised as a USB device.
That's everything connected!
Since the stepper motor (hopefully!) underwent a successful self-test routine when the power supply was connected, all that is left to do is to test the tactile buttons and 7 segment displays of the chronometer.
For some reason that remains unknown to me, Opencockpits, in the manual provided for the chronometer, provide a SIOC test script that the user has to import into SIOC, successfully compile, and then save in .ssi format, before reloading SIOC with this new, compiled file. Whilst this is certainly not the most difficult of tasks, it seems to me like a lot of needless hassle!
The latest versions of SIOC feature the “SIOC Monitor”, a powerful, very simple to use piece of testing software that simply requires to be clicked on in order to activate. Once activated, the monitor will produce visual confirmation of any button presses, and features individual output control which allows the user to control individual 7 segment units. In my opinion, this is a much, much more friendly, intuitive and interesting way of testing the chronometer, and since Opencockpits developed the SIOC monitor themselves, I am at a loss as to why they have not suggested using it in the manual!
Assuming that all has been plugged in, and assuming that you have the latest version of SIOC installed, double click the SIOC.exe icon to start SIOC. From the main SIOC window that appears, click on the “SIOC Monitor” button. The following window should appear:
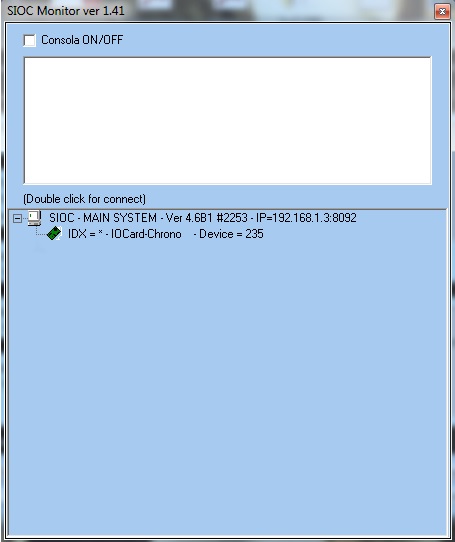
SIOC Monitor
Double click on the “IOCard-Chrono” entry. This should bring up the main testing interface, which has been annotated below:

Chrono Tester Annotated
The 7 segment displays of the chronometer can be tested through the “Display Digits” section. Typing a number in the “Position” window chooses an individual 7 segment display, and typing a number in the “Value” window should send that number to the chosen display. The 7 segment displays are numbered as follows:

SIOC Monitor Numbering
10 – Blank Cell
11 – Hyphon (-)
12 - “Special” number six -
13 – Lower case “t”
14 – Lower case “d”
15 – Underscore (_)
The final points of attention are the “ALL ON/OFF” buttons. Clicking on these will turn all outputs on and cause all of the 7 segment displays to display an “8”. This, of course, is the simplest and quickest way to test the chronometer.
Whilst I am convinced the one-click testing offered by the SIOC monitor is much easier than using the aforementioned SIOC test script, some users may prefer to use the latter.
Should you wish to test the chronometer using Opencockpits' SIOC script, full instructions on how to do this are included in the Opencockpits manual. The test script drives the chronometer such that it functions how it would with FS2004/FSX/X-Plane running, complete with seconds needle movement. However, since one will (hopefully) be getting the chronometer running with Flight Simulator anyway, I don't really think there is any need for it.
Using the Chronometer with Flight Simulator
Since the chronometer is interfaced to flight simulator using SIOC, the device is extremely flexible in terms of what it will work with. In fact, there is no reason why there should be any add-on software that is incompatible with the chronometer, since the majority of its functions rely only upon “background” flight simulator information such as simulator time or date, which are obviously not aircraft-dependent.
On the chronometer's product page at Opencockpits' website, a free SIOC script is available to download which drives all of the chronometer's functions without requiring any programming effort from the user. This section will discuss the use of this script.
Assuming that you have downloaded the script in question, and saved it to an accessible region of your hard-drive, start SIOC. The first step is to configure the SIOC.ini file such that it will recognise the chronometer.
With the chronometer plugged in, from the main SIOC window, take note of what is displayed in the “Devices” window. The number displayed alongside the chronometer's entry is its unique identifier (device number) for that particular USB port. Having noted this number, click the “EDIT .Ini” button.

SIOC Window Device Number
[chronometer]
MASTER=16,16,1,X
Where X is the aforementioned device number for the chronometer (note that this number will change if you plug the chronometer into a different USB port). Secondly, find the entry:
CONFIG_FILE=Y.ssi
Where Y is any name of your choosing; this is what we will save the SIOC file as later. Logically, you may wish to choose a name such as “chronometer”.
Click “file”, and then “save”. Once again, the main SIOC window should be visible.
With the SIOC.ini file configured, all that is left to do is import the script that Opencockpits have provided.
Click on the “Edit Script” button. Then, from the window that appears, click “File”, and from the drop down menu select “Import TXT”.
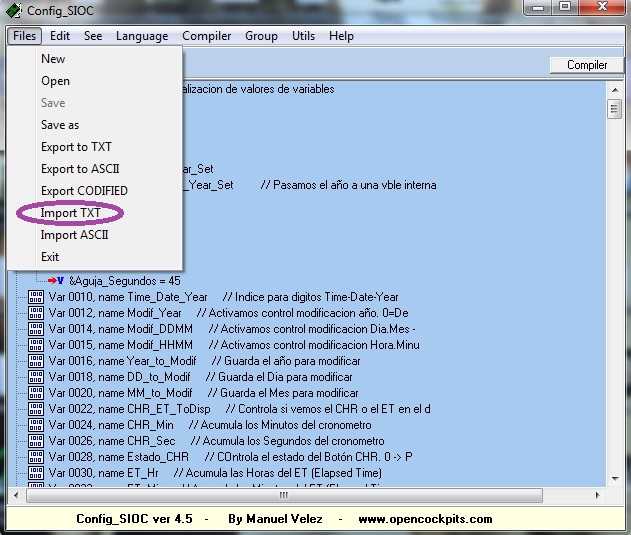
Edit Script Window

Successful Import
That's everything done!
Opencockpits' product page states that the script that we have just installed above only works for the default B737. However, I have used the script discussed above without any problems on a huge variety of flight simulator aircraft (both payware and freeware add-ons). Indeed, I have yet to find an aircraft that the script doesn't work with.
Close everything SIOC-related down, and fire up flight simulator. Select an aircraft of your choice, and, once your flight has loaded, start SIOC. The chronometer's 7 segment displays should then spark to life whilst the seconds needle makes a single complete calibration rotation.
Using the Chronometer with the Level-D 767
This section applies only to those using the Level-D Simulations 767.
Nico Kaan, the developer of the popular cockpit-building program Lekseecon, which connects SIOC to the Software Development Kit (SDK) of the LDS-767, has also produced a special executable file that offers one-click interfacing for Opencockpits' USB modules. The advantage to this is that if using the LDS-767, absolutely no SIOC related work is required whatsoever; simply running this executable file will instantaneously configure everything.
To use this program, simply download Lekseecon (free of charge) from his website http://www.lekseecon.nl
Another advantage to using Nico's software is that it ensures that the chronometer needle remains fully synchronized with the on-screen needle of the simulated aircraft. Furthermore, Nico's software provides full cold and dark functionality; that is, the chronometer will not function at all unless the aircraft electrical systems have been suitably configured in flight simulator.
FSX Functionality
Before we take a look at how well the chronometer's individual features perform, this section will give a brief overview of the functionality of the chronometer when working with flight simulator with Opencockpits' supplied chronometer script.

TIME/DATE: Cycles the top row of 7 segment displays between time and date (time (HR:MIN) ? time (MIN:SEC) ? year ? date (DAY:MONTH))
SET: Pressing this will cause part of the top row of 7 segment displays to flash, and allow you to change their value using the +/- keys. It should be noted, however, that the chronometer automatically synchronizes to flight simulator date and time upon initiation of a flight, and so the time/date entries should already be correct. Once the desired value has been set, pressing this key again will allow you to change another value. To confirm the adjusted value(s), keep pressing SET until the displays stop flashing (very similar to the old Casio digital watches!).
+/- Keys: Change the value of a selected data field.
ET: Pressing this key will cause the lower row of 7 segment displays to read Elapsed Time (ET). Pressing the key for a second time will start the elapsed timer, and pressing the key for a third time will stop the elapsed timer (and pressing it again will start it, and so on). The beauty of the elapsed timer is that it can run seamlessly alongside the “normal” chronometer timer (using the CHR) key; pressing CHR twice whilst the elapsed timer is running will start such a timer, and pressing the ET key at any time will return the lower display to reading elapsed time. It's all a bit fiddly to explain and (understand!) unless you actually have the chronometer in-front of you.
RESET: Resets a timer (ET timer or “normal” timer). Upon being pressed, the timer's values will reset to zero, and the seconds needle should rotate clockwise all the way back to the start position, ready to be used again.
There are several other impressive features that Opencockpits' chronometer script includes, and for full details one should refer to the manual. One of my personal favourites is that if the CHR and RESET keys are pressed simultaneously, the lower display will go dark, allowing just the upper display to be used as a time/date reference; the neat thing being that the seconds needle will deflect to the 45-seconds position, giving you an uncluttered view of the upper display.
Time to asses how well the chronometer delivers!
As a Whole...
All in all, I have little hesitance to say that the chronometer really is a beautiful little unit. As touched upon before, it has a nice compact, robust feel to it. At the time of writing this review, I have not encountered a (single!) problem or point of concern with the chronometer, which really suggests that Opencockpits have upped their game in terms of the quality of their products. Historically, I have always encountered a few software-based or documentation related (though never with the hardware itself) problems with some of Opencockpits' products, but this chronometer really feels different. I am thoroughly impressed!
Backlighting
Both the seconds scale and the surrounding faceplate of the chronometer are fully backlit, which is powered by the 5V power supply. Keeping in line with the rest of the unit, the backlighting is crisp and clean, with no light bleed-through.
The backlighting certainly looks rather impressive at night, and as well as serving as a nice visual feature, also does a good job at doing what it's supposed to do; illuminating the crucial components of the chronometer.
Since the backlighting is powered exclusively by the 5V power supply, there is a potential downside; the backlighting cannot be turned off. Whilst this may not be of concern to non cockpit-builders, those with fully fledged cockpits will, of course, have the desire to disable the chronometer's backlighting when the aircraft's electrical systems have been turned off. This can very easily be solved by connecting the 5V supply socket to an output of an I/O Card of your choice; just make sure that this output is capable of providing a reliable source of current (since the 5V supply also powers the chronometer's stepper motor).
Stepper Motor
It has rightfully been given a lot of attention already in this review, but the stepper motor deserves a section of its own.
After extensive use of the chronometer, it is evident that it is a high quality, durable component. In my previous experience with stepper motors, I found that it was reasonably difficult to source one that was reliable; problems were often encountered involving erratic needle movement. The chronometer's stepper motor has no such problems. For the record, the stepper motor is of the unipolar type; I mention this because cockpit builders will certainly be aware of the existence of unipolar and bipolar types.
Another impressive point of mention is that throughout its rotation, the needle remains well aligned with every single seconds detent on the faceplate. Since the 7 segment display has the ability to count the exact number of seconds elapsed, this degree of accuracy may not be drastically important for casual simmers, but it is vital to cockpit builders who strive for perfection.
This leads onto another very important issue. The way in which the needle moves depends directly upon how the script that drives the chronometer has been designed. Earlier in this review it was discussed that one could use the default script provided by Opencockpits, or perhaps the script provided by Nico Kaan for use with the LDS 767 program. Personally, I have noted that Opencockpits' script is somewhat smoother; this is because Nico's script aims to syncronize the chronometer with the one in the LDS 767's panel, hence any imperfections in the panel needle's movement will be transferred to the chronometer.
The reality is that there is no restriction to how the chronometer's needle can be programmed to rotate. Both Opencockpits' and Nico's script emulate the “clock” style of seconds needle; that is the needle “ticks”, there is one movement per second of time elapsed. However, some people seem to prefer the continuous rotation type of seconds needle (like that found on the more expensive wristwatches); this should not be impossible to achieve, although a reasonable amount of SIOC knowledge would be required. Alternatively, one could always root around in the many SIOC scripts available through the cockpit building community to see if someone has already produced such a script.
Faceplate and Engraving Quality
Once again, full marks here. All engravings into the faceplate material are very clear cut and well defined; there is no “blurring” of label edges. If one gently runs his finger against the engravings of the faceplate, it is possible to “feel” the depth of the engravings, which, in the case of the chronometer, have a lovely high quality texture to them. Whilst such details are probably of no interest to most people, they are, similar to other details mentioned in this review, of interest to cockpit builders. In fact, some hardware manufacturers even differentiate their pricing such that different engraving techniques and faceplate materials work out to cost different prices.
The faceplate and clock scale also accompanies the backlighting very nicely; giving it a nice warm feel.
Buttons and Switches
The simple design of the chronometer is such that it features only eight, identical simple switches. As is the case with the real unit, all of the push buttons are tactile; that is, they give a confirmatory “click” when pressed. The switches are solid and have survived the several months I have owned the chronometer well. That being said, they are just switches, so there's not really a lot that can go wrong here!
7 Segment Displays
The chronometer plays host to two four-digit rows of 7 segment displays, the functions of which have already been discussed at length. As with most of their products, Opencockpits offer the 7 segment displays in either orange or white, and although their website is not particularly clear about this, I believe the white variant costs slightly more as, for reasons unknown to me, white 7 segment displays are more expensive than orange ones.
The 7 segment displays are recessed behind the clock face very nicely and blend in very well with the unit. They are very crisp and legible and really add the finishing touches to what is a most professional product.
A point of mention is the inclusion of decimal points in the 7 segment displays. There are three decimal points in total; a single decimal point at the centre of the top row of displays, and two decimal points on the bottom row of displays, with one at the centre and one at the end of the displays. The purpose of these decimal points is dependent entirely upon what the author of the SIOC script has instructed them to do; the most obvious use of them being to separate minutes and seconds (or hours and minutes).
The only (minor) complaint here is that in the real unit, the “decimal points” are actually colons, as is the case with the vast majority of digital time formats. For example, in a real Boeing chronometer, “twelve minutes and twenty-seven seconds” would look like this: 12:27
However, due to Opencockpits' use of decimal points instead of colons, it actually ends up looking like this: 12.27
The reason for this is obvious, and will be immediately apparent to many cockpit builders. Simply put, 7 segment displays with decimal points are much more standard and commonplace (and hence easier to obtain) than 7 segment displays with built in colons, which are naturally going to be more expensive due to their rarity. However in Opencockpits' defence, other hardware manufacturers appear to have done exactly the same thing, and so it is perhaps unfair to fixate upon this particular issue. But, does it really matter?
Demonstration
I have a prepared a video which shows the chronometer in action.
Documentation
Opencockpits have provided an 11 -page PDF manual to accompany the chronometer. Although there are some translation errors, this manual is leaps and bounds ahead of Opencockpits' previous documentation; it is very detailed and contains step-by-step image based instructions on how to compile and configure the SIOC scripts, much like I have done so earlier in this review.
Previously, some of Opencockpits' manuals lacked detail on the scripting front, which caused significant confusion amongst first-time buyers unfamiliar with the SIOC concept. The chronometer's manual is infinitely better, and should prove completely understandable to most users.
Conclusion
The chronometer is, without a doubt, the best Opencockpits product I have reviewed to this date. It is compact, sleek, well-finished, fully-functional, easy to use and, most importantly, very low priced in comparison to competing and similar products.
In the past I have made several recommendations in my reviews to Opencockpits regarding some of their products. The chronometer, whether through these recommendations or not, represents a huge improvement and overcomes all of these past problems by a considerable margin.
Summary
Pros:
Very compact and solid feel
Full functionality
Very reliable
Easy to set up
Lovely warm backlighting
Excellent engraving quality
Cons:
Decimal point used instead of colon for timer display – a very minor point!
Score

Opencockpits' 737 Chronometer is awarded an overall Mutley’s Hangar score of 9.5/10, with an "Outstanding" and a Mutley's Hangar Gold Award.