Mutley's Hangar
A Haven For Flight Simulation Enthusiasts!

For FSX/Prepar3D Manufactured by FlightSimPM-UK
Reviewed by Brian Cowell
November 2015
It all started in Cosford
Whilst strolling around the other stands at the Flight Sim Show at
the RAF Cosford Museum a few weeks ago, my eye was caught by the
FlightSimPM-UK stand. In fact, I had previously visited their web
site, which states that “We started late 2013 focusing on providing
realistic airliner handle sets that fit 2 Saitek throttle
quadrants.”
Well as it happens, I do possess two Saitek TQs which are pretty
much unused, so I was interested to see what possibilities might
exist. The company produces various handle sets for both Boeing and
Airbus (see
http://www.flightsimpm-uk.co.uk/apps/webstore/ ![]() for their full
range of items) but since I normally only fly the 747-400 my
interest was obviously focused on their offering for that particular
aircraft.
for their full
range of items) but since I normally only fly the 747-400 my
interest was obviously focused on their offering for that particular
aircraft.
This consisted of a number of items (all of which will be
illustrated in the pictures which follow).
First of all, there is a plastic box (“brown quadrant box”), which
is indeed made in a tasteful shade of Boeing brown, and is designed
to accommodate two Saitek Throttle Quadrants (TQs), positioned at a
more suitable angle for airliner use.
You also need a template (“747-400 template with markings-tan
brown”) which provides the appropriate flap positions (in
particular), and is screen-printed on a flexible sheet of plastic.
Clearly, for the 747 you will need four suitably numbered throttle
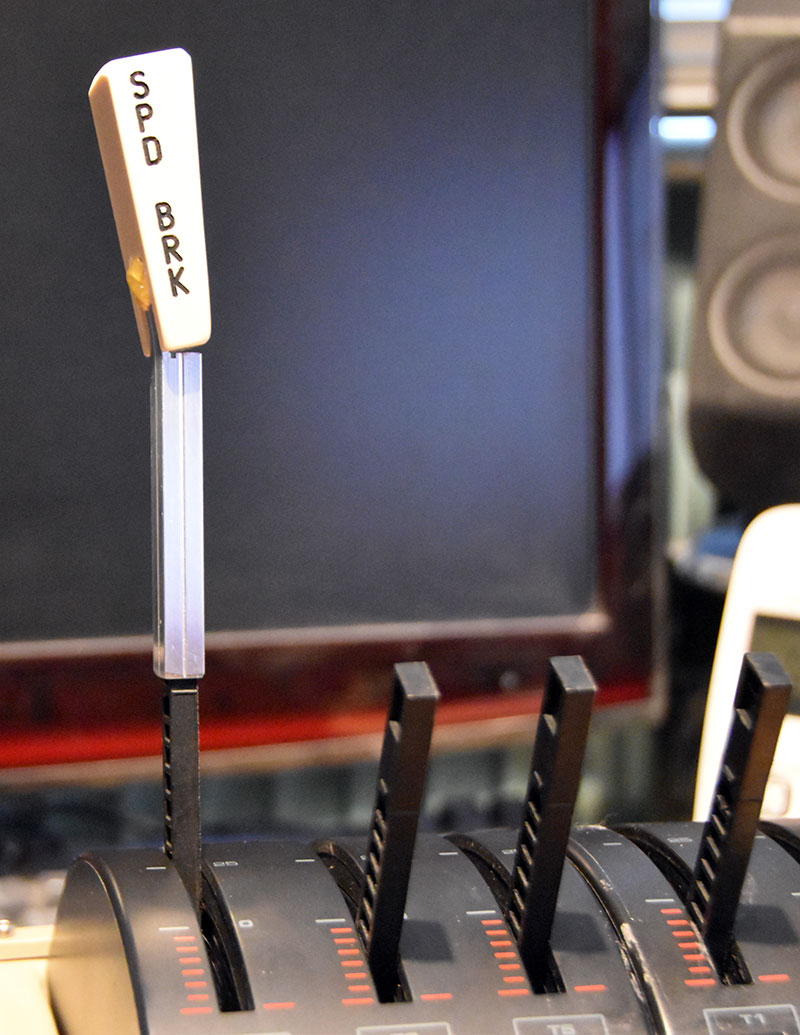
levers (“Boeing 747-400 handle set”), as well as the speedbrake and
flap levers: (the set) "...comes with 4 levers and reverse handles,
a flap lever and speedbrake lever just slot over the quadrant levers
to make a realistic airline throttle quadrant.”).
However, to use the flaps you also need to buy the “Boeing
747,777,767,757 flap kit (toothed arc, handle, and spring)”.
Clearly, the number of teeth on the arc depends on the number of
flap positions of the aircraft concerned.
Anyway, after some hesitation I bought the complete 747 set, which
worked out as follows:
| “Brown quadrant box” | £30.00 | |
| “747-400 template with markings-tan brown” | £ 6.50 | |
| “Boeing 747-400 handle set” | £67.00 | |
| “Boeing 747 flap kit” | £12.50 |
I walked away from the stand strangely conscious that I had just parted with £115.50 for a plastic bag containing a plastic box full of, er, bits of plastic.
As well as the Boeing 747 set, incidentally, the company also offers the following (see their web site for details):
Boeing 737-800 Single Handle Set
Boeing 737-800 v4 Pro Handle Set
Boeing 767-300 Handle Set
Boeing 757-200/300 Handle Set
Boeing 777-200/300 Handle Set
So how did the 747 handle set stack up? Read on to find out.....
Part 1 — assembling the parts to the Saitek TQs
The following picture shows the side of the brown quadrant box, as well as the handle set, and the flap kit. (More about the template soon).

The Complete Kit
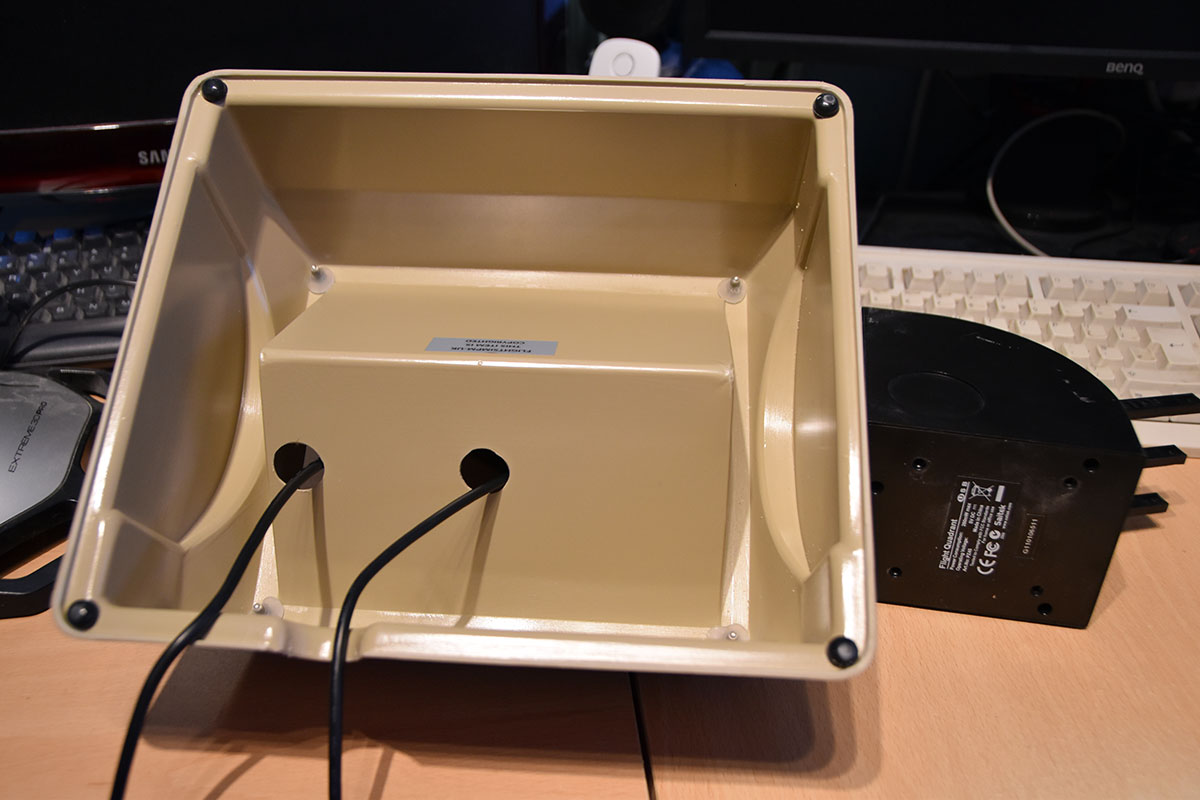
Plastic Box - Underside

TQ Cables Threaded Through
-with-TQs.jpg)
Box (top) with TQs
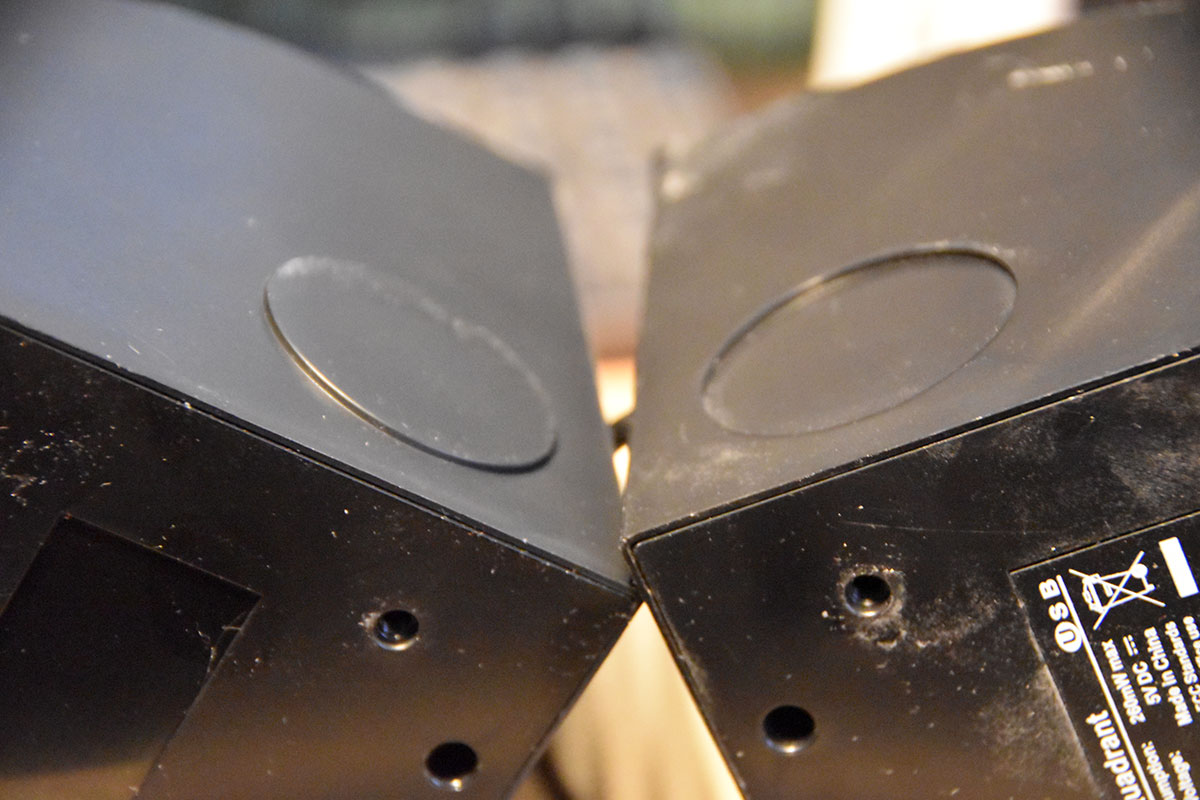
Match These Up or it Won't Fit
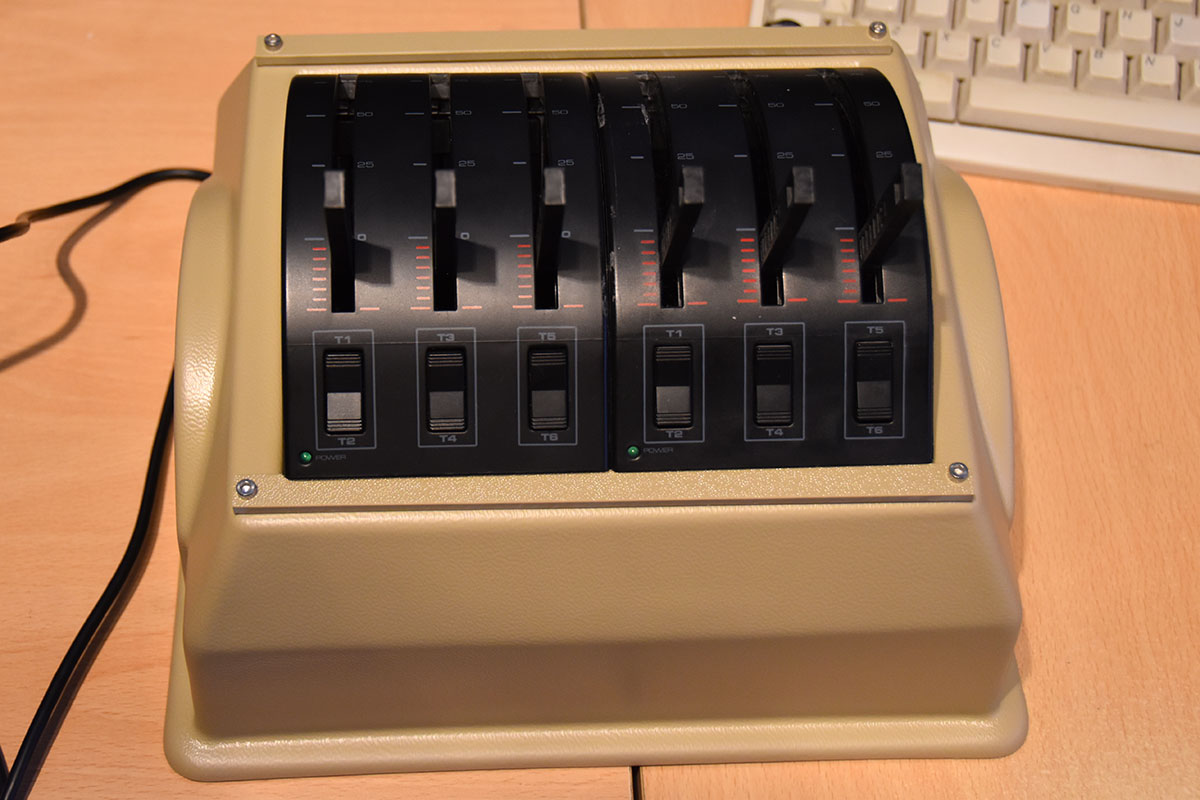
TQs Dropped Into the Box

Template Prior to Fitting

Template Insertion

TQs in and Template Fitted

TQs in - Unpack Levers

|
However, I was somewhat unimpressed to find that the speedbrake
handle had an extremely large lump of glue on one side. But at this point I also encountered what might be a showstopper for some. The reason why it is necessary to pull the Saitek coloured knobs from the throttle levers is that there’s a small plastic lug on each lever which engages with a slight receptacle inside the moulding of the Saitek knobs, holding them securely in place. |
|
| Most unfortunately, the FlightSimPM-UK levers have no such fitting, and hence it’s impossible to simply push them onto the Saitek throttle levers so that they click into place. Instead, they simply hit the plastic lug and refuse to go any further (see picture). The sparse instructions blandly recommend using “a Stanley knife” (!) to shave off the protrusions so that the FlightSimPM-UK mouldings can then fully fit over the lever. The obvious snag, of course, is that this is a one-way street. Taking a deep breath, I used a modeller’s fine file to remove the absolute minimum amount of material necessary to enable the FlightSimPM-UK mouldings to fit; but nonetheless — having done that, the Saitek knobs would no longer hold in place. Purchasers of these levers should, I feel, be made aware from the outset that it is necessary to surgically modify your Saitek TQs in order to accommodate the levers, and that the original Saitek knobs will no longer fit as a result. |
|
This Bit Has to be Removed
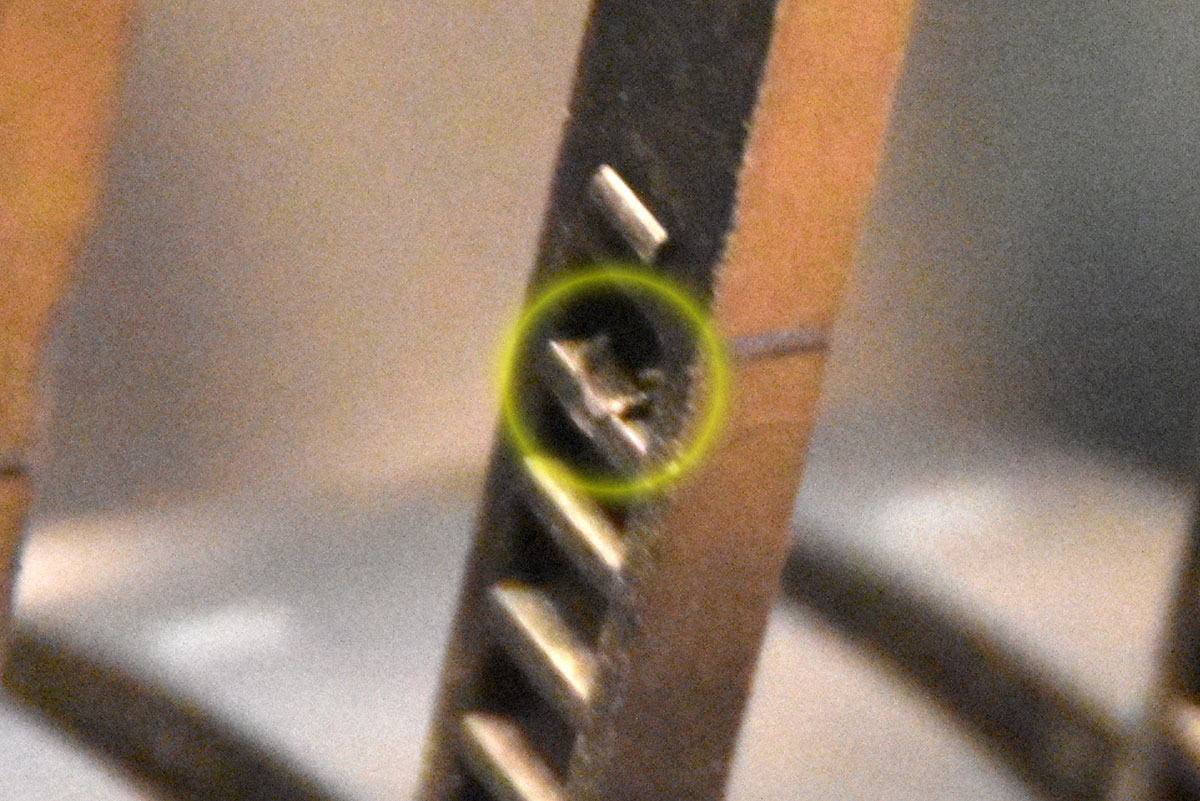
As you can see, this embodies a large spring which keeps the peg (of a kind which will look familiar to anyone who has ever used dowelling in woodworking joints) in contact with the appropriate detent in the “toothed arc”. My problem was that nowhere could I see any instructions about attaching the “arc” to the whole assembly. |

|
|

|
||
In fact, the answer turned out to be simple — on one side of the arc there was a glossy green strip which, when peeled back with a fingernail, turned out to reveal an adhesive pad below (see pic). |
After removing the plastic strip, I pressed the arc to the side of the plastic box, and it seemed to hold fairly securely. Here is the complete flap lever assembly:

Flap 30 Detent
| <sigh> My immediate impressions, to be absolutely honest, were none
too favourable. The ugly blob of glue, the need to physically modify
the Saitek TQs, the way in which (in the absence of any tightening
mechanism whatever) everything felt just a little bit sloppy in use,
all these combined to give an impression of a product which was not
top of the line, let alone worth more than the price of the two
Saitek TQs which had been sacrificed to bring it into being. That initial impression was not confined to the appearance, however. OK, the reverse levers are dummies with no practical use whatsoever other than to look the part, but they fail to do even that when they are badly spaced and not even in line; and worst of all I found that they sometimes interfered with the travel of the adjacent levers when they were separated and then brought together again (see the next two pics). |

|

Assembled - Misaligned Reversers
In general, however (and at this point I was still judging entirely on appearances, you understand) I have to say that although the overall appearance of the unit was reasonably convincing, when looking at it more closely then sadly some of the details did tend to offend the eye somewhat. I’m reminded of W.S Gilbert’s cutting dismissal “She may very well pass for forty-three — in the dusk, with the light behind her”. This unit has a lot going for it: I really wanted to like it, but at that point I have to admit that it was failing to charm me.
Before flight testing, however, it’s obviously necessary to interface the unit to an aircraft (a 747, in this case) in FSX. No instructions or even suggestions are provided for doing this: and although, as it happens, none are needed in my case, I still found the omission to be a surprising one, since the unit is pretty much useless until it is successfully interfaced with the aircraft with which it will be used.
I opted to test the unit using the venerable PMDG 747 “Queen of the skies” aircraft, which has been around for almost ten years and is “soon” (in the familiar ‘don’t ask questions’ PMDG usage) to be replaced with a new version. However, whilst interfacing the hardware controls with the aircraft’s virtual ones is something that obviously has to be done — probably using FSUIPC —that operation clearly does not form part of this review.
I interfaced the levers to their counterparts in the PMDG 747. For testing purposes I didn’t use the small hardware switches below each lever on the Saitek quadrants, since they form part of the Saitek units and not the equipment under review. I then embarked on my flight testing of the complete unit.
Part 2 — Flight Testing with the PMDG 747, Part 1
I won’t weary you with a blow-by-blow account of each of my test flights: suffice it to say that I used several day and night flights in and out of a variety of both long and short (by 747-400 standards) runways, to give a typical operational mix, with care being taken to experience a number of engine fires and other malfunctions so as to also test the use of a subset of the throttle levers. My initial findings were as follows.
Appearance
As mentioned above, at a casual glance the unit does look the part, but closer inspection quickly revealed problems, mostly concerning the throttle levers. Those problems are exacerbated by the fact that the replacement throttle levers simply drop over the Saitek TQ levers, with no way in which they can be tightened or secured. Therefore, when operating all four levers whilst watching the out-of-the-windscreen view, I sometimes found myself lifting the throttles away from the base (in fact, they are so loose that it’s also possible to swivel each of them in an arc of around 20°). Fortunately, the speedbrake and flaps levers didn’t suffer from this problem to a noticeable extent — although their mode of operation is rather different from that of the throttles, of course.
Stability and “Feel” of the Unit
It has to be said that the Saitek TQs are not the smoothest-operating devices, and so any notchiness and roughness that can be felt during throttle lever travel is attributable to Saitek, and not to FlightSimPM-UK. However, as can be seen from the photograph at the start of this review which showed the underside of the quadrant box, it is fitted with four rubber feet which, when combined with the angle at which the TQs sit, is meant to ensure that the unit will not move in use. Whilst this was sometimes the case, when first moving all four throttles out of their detent for take-off, I invariably found it necessary to remove my other hand from the yoke for long enough to hold the unit down whilst the levers were freed from the detents, which was an irritating distraction at a time when one needs to have a clear mind in order to concentrate on various aspects of the take-off. The unit did also move at other times, too.
“Reverser Lever” Problems
Although the reverser levers on the throttles are dummies, during the first test flight they nonetheless caused me more nuisance than any other aspect of the handles’ operation. The “reversers” are in fact articulated, moving over a short arc, but several times in my irritation I frankly had to fight the urge to break them off and throw them out of the window.
The first problem was that the manufacturing tolerances are sufficiently wide that even when all four throttles are at idle (i.e. sitting in the Saitek detent), with the reversers in the down position they were very visibly unevenly spaced — and they also varied in height. Frankly, the result was not pleasing to the eye.
The second problem (collisions between the levers when they are moved independently) has already been referred to, and derives from the first. So much so, that at the end of the first of my test flights with a couple of engine failures necessitating the use of a subset of the throttles, and subsequently, following a tricky landing with cross-wind gusts using the two remaining engines, I headed at speed for a restorative glass of single malt — and at that point I have to admit that I very nearly abandoned the project as a dead loss.
But I had trouble sleeping that night (which isn’t attributable to the handles, since it’s something that’s not unusual for me), and over and over again I found myself wondering what was wrong with the unit. Surely it couldn’t have been as badly designed as that, could it? Then I started thinking in more detail about the crazy reverser problem (as shown in the previous photo) — and suddenly I had a suspicion that I knew what might be wrong.
Sleep being impossible at that point anyway, I got up in the middle of the night to investigate, and sure enough, my hunch was right. If you look at an enlargement of the above photo and concentrate on the part of the reverser levers boxed in red (see the pic below), you will then observe that the reverser lever which should be on throttle 4 has in fact been mounted on 3, and vice versa. (They arrive already assembled, so this occurred during manufacturing).
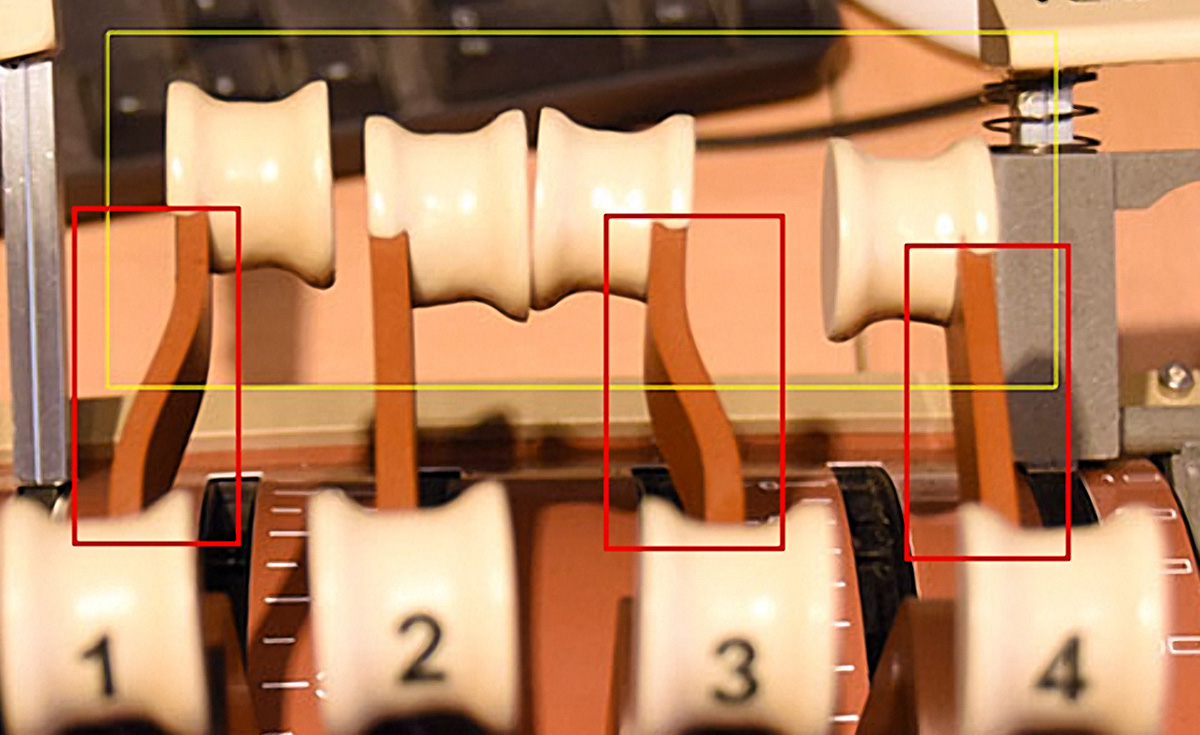
Wrong Reverser Levers

Misplaced Outer on T3
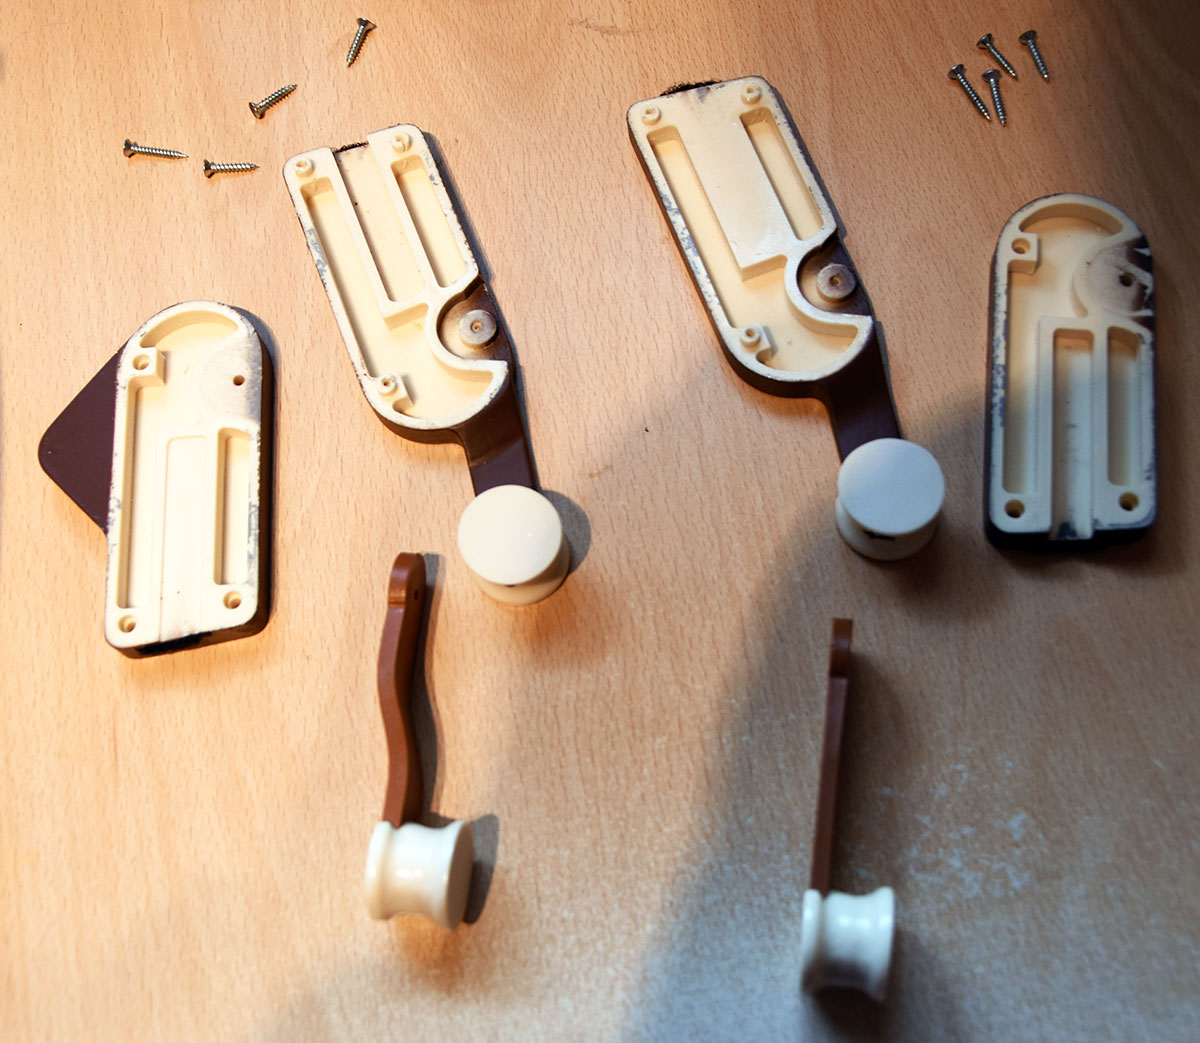
Dismantled T3 and T4

Outers Correctly Positioned

Knob Spacing much Improved
Part 3 — Flight Testing with the PMDG 747, Part 2
For comparison purposes, I first of all repeated the flight I had carried out the previous day, even to the extent of setting the same engine failures. The “feel” of the unit was indeed improved, although (owing to the spacing of the Saitek levers, which is not something that we can do anything about) even my fairly large hand had difficulty holding all four throttles as a group — on the aircraft the throttles are so close together that they almost touch one another and hence fit the hand very well, but these more widely-spaced throttle levers are less easy to manage. In spite of that, I did nonetheless find myself using the throttles more naturally than previously — although for long-term use I would definitely be looking to attach the quadrant box firmly to the desk, and also (if possible) attach the throttle levers themselves more firmly to the Saitek TQ.
Regarding the latter point: I can envisage that perhaps the levers were left loose with the idea that a simmer could, if required, swap the 747 handle set for company’s the 737-800 set, for example, without needing to take the TQs out of the plastic box. But to achieve that it would also be necessary to change the “toothed arc” for the flaps lever to one that accommodated two more flaps positions, and also to swap the template to one with matching flaps position markings — which could be less easy to do. (And would the glue on the toothed arc’s glue band survive repeated reapplications, I wonder?). But nonetheless, the addition of a small grub screw to hold the levers more securely to the underlying TQ would, I feel, be a significant improvement.
However, having used a couple of woodworking clamps to hold the plastic box firmly to my desktop (nul points for style, but it did make the unit much more usable), two more test flights entirely confirmed the improved impression which was received in the first flight after they were reconstructed. The levers could still not be said to be state of the art, but (when put together as they were presumably intended to be) they do constitute a poor man’s set of pedestal controls which combine reasonable looks with a certain utility value.
Summary, and Scores
I found this handle set frustrating chiefly because it seemed to me that if just a few things were different it could be so much better.
There is also the question of price: I am well aware that realistic-looking throttle units command premium prices, but this is a set of plastic levers that are a loose fit over the underlying Saitek TQs, and which have dummy reversers with no reverser capability other than by utilising the Saitek virtual buttons. (Compared to the more expensive units there are also no autopilot disconnect buttons, TO/GA buttons, trim wheels, or fuel cut-off switches, either). I feel that the look of the unit would be improved if the “reversers” were moulded in one piece with the body, which would improve their alignment compared to being (for no good reason that I can imagine) articulated. An even greater improvement would be to mimic the original Saitek knobs’ attachment system, so that the levers would click into place over the (unmodified) Saitek lever arms and be held firmly, with no movement.
The overall appearance of the lever kit is certainly a cosmetic improvement, but it utilises Saitek throttle quadrants underneath (whose problems with spikes and consequent need for contact cleaner are well known to the simming community). So at £115.50 (the cost of the two Saitek TQs is not included in that figure, of course) I am not entirely happy about the quality of what I received in exchange for the price paid. Especially (it has to be said) when I had to rebuild two of the throttle levers in order to restore the unit to the way it should have been in the first place.
Pros (What I liked about the FlightSimPM-UK handle set):
• The overall appearance of the (correctly constructed) unit was a huge improvement on Saitek’s GA-oriented “coloured knobs”, and it did then
bear a distinct resemblance to the assembly at the forward end of a 747’s centre pedestal.
Cons (What I didn’t like about the FlightSimPM-UK handle set):
• The construction quality (glue blob, incorrectly-assembled thrust levers, poor tolerance on the “reversers”).
• The absence of any warning prior to purchase that it would be necessary to surgically remove the Saitek ‘click stop’, with the result that Saitek’s
own knobs would no longer fit without dropping off.
• The terse instructions. (And for many people, some sort of help with interfacing the hardware to their flight sim software — even if it only took
the form of some helpful Internet links — would be a sensible addition).
• The absence of any simple means to attach the slip-on new levers firmly to the Saitek levers —and the “toothed arc” to the side of the unit —
in a way such that although they are steady in use they could be easily detached if required to use an alternative lever set from the same
company. (Come on, guys, it’d be good business, too!).
Accordingly, my scores for the 747 lever kit are as follows:
• Ease of Setup: 9 (Would have been 10 if better instructions had been provided: please note that “setup” in this context does not include using
FSUIPC to interface the unit to the aircraft, however!).
• Build Quality: 5
• Performance Against Expectations: 6
• Value for money: 7
Overall score: 6.75
I do hope that the company continues to improve this product, since I believe it has good potential if some of the matters referred to above can be addressed. However, an outside factor that did concern me a little (as a possible limit on its development) is the availability of Saitek Throttle Quadrants, which seemed to be out of stock at a number of the usual suppliers when I checked just now (late October, 2015), which seems strange. There were none available at the Cosford show, either (although that might be owing to the surprising lack of a Saitek stand at that show ) — as for the other suppliers, given the time of year it may simply be that perhaps their Christmas orders haven’t come through yet.
So as an improvement on the look of the Saitek TQs when used for airliner flying, the FlightSimPM-UK lever kit is certainly worth your consideration — as long as you don't mind permanently modifying your Saitek Throttle Quadrants to make the new levers fit, and are also totally confident of your ability to interface the Saitek controls with your aircraft of choice (using FSUIPC, or some other means to accomplish the same task).
FlightSimPM-UK
http://www.flightsimpm-uk.co.uk/
The following information is abstracted from their online descriptions:
Boeing 747,777,767,757 FLAP KIT
(toothed arc, handle, and spring)
£12.50
BOEING 747-400 HANDLE SET
(four levers, speed brake, and flap handle)
£67.00
BOEING 747/777/767/757 BROWN QUADRANT BOX
(just the box)
£30.00
AIRLINE TEMPLATES FOR THE QUADRANT BOXES
1) 747-400 TEMPLATE WITH MARKINGS-TAN BROWN
2) 777-300 TEMPLATE WITH MARKINGS-TAN BROWN
3) 767 -757 TEMPLATE WITH MARKINGS-TAN BROWN
4) 737-800 TEMPLATE WITH MARKINGS-GREY
5) AIRBUS TEMPLATE WITH MARKINGS-GREY
All these templates are brand new ones and are screen printed and not stickers anymore.
£6.50
(So total cost for the 747 set was £115.50)
Also available:
Boeing 737-800 Single Handle Set
Boeing 737-800 V4 PRO HANDLE SET
BOEING 767-300 HANDLE SET
BOEING 757-200/300 HANDLE SET
BOEING 777-200/300 HANDLE SET
| Scores: | ||
| ● Ease of Setup: | 9.0/10 | |
| ● Build Quality: | 5.0/10 | |
| ● Performance Against Expectations: | 6.0/10 | |
| ● Value for money: | 7.0/10 |
FlightSimPM-UK Simulations' 747 Lever Kit is awarded a Mutley's Hangar score of 6.75/10. |